
Po Tat is another dim sum or Chinese bakery dessert that is an out of this world treat when served freshly made at home. We love the creamy egg custard in a crispy puff pastry tart shell. Serve po tats as an afternoon snack, anytime dessert, or siu-yeh (late-night snack).
You will need to allow 4-4.5 hours to make this recipe but there’s very little hands-on time, just a lot of waiting around for the puff pastry to relax and to keep the butter chilled. I’m providing a “Jump to recipe” button below but this recipe is intermediate to advance and there are a lot of tips and explanations that may be helpful.
Disclaimer: I am a brand ambassador for Rodelle and receive products to use and review. Please check that all ingredients are suitable for your allergies and be sure to ask your medical care team regarding any allergy related questions (I do not share medical advice). As an Amazon Associate I earn from qualifying purchases.
Jump to RecipeMacau-Style Portuguese Custard Tart
One of Portugal’s famous desserts is Pasteis de Nata. The Portuguese custard tarts have a crispy, flakey, buttery tart shell baked with an eggy custard that is slightly carmelized like a creme brulee with hints of lemon and cinnamon in the custard.
Macau’s adoption of Pasteis de Nata is due to the Macau’s history as a former Portuguese colony. Macau’s Chinese cooks made their own version of Pasteis de Nata that is creamier, a little bit less sweet, and more egg-y in flavor. Chinese people refer to this dessert as “Po Tat” (Portuguese tart). A reader shared that a man named Andrew Stow is most famously associated with Po Tats.
You might have also heard of “Daan Tat” (sounds like “don tot”) which is a Hong Kong version of an egg custard tart. A daan tat is usually a shortbread or a flakey fluted crust baked with a bright yellow custard. The custard will be even more egg-y and firmer compared to a po tat. It’s much more common to find daan tats than po tats at dim sum restaurants and Chinese bakeries.
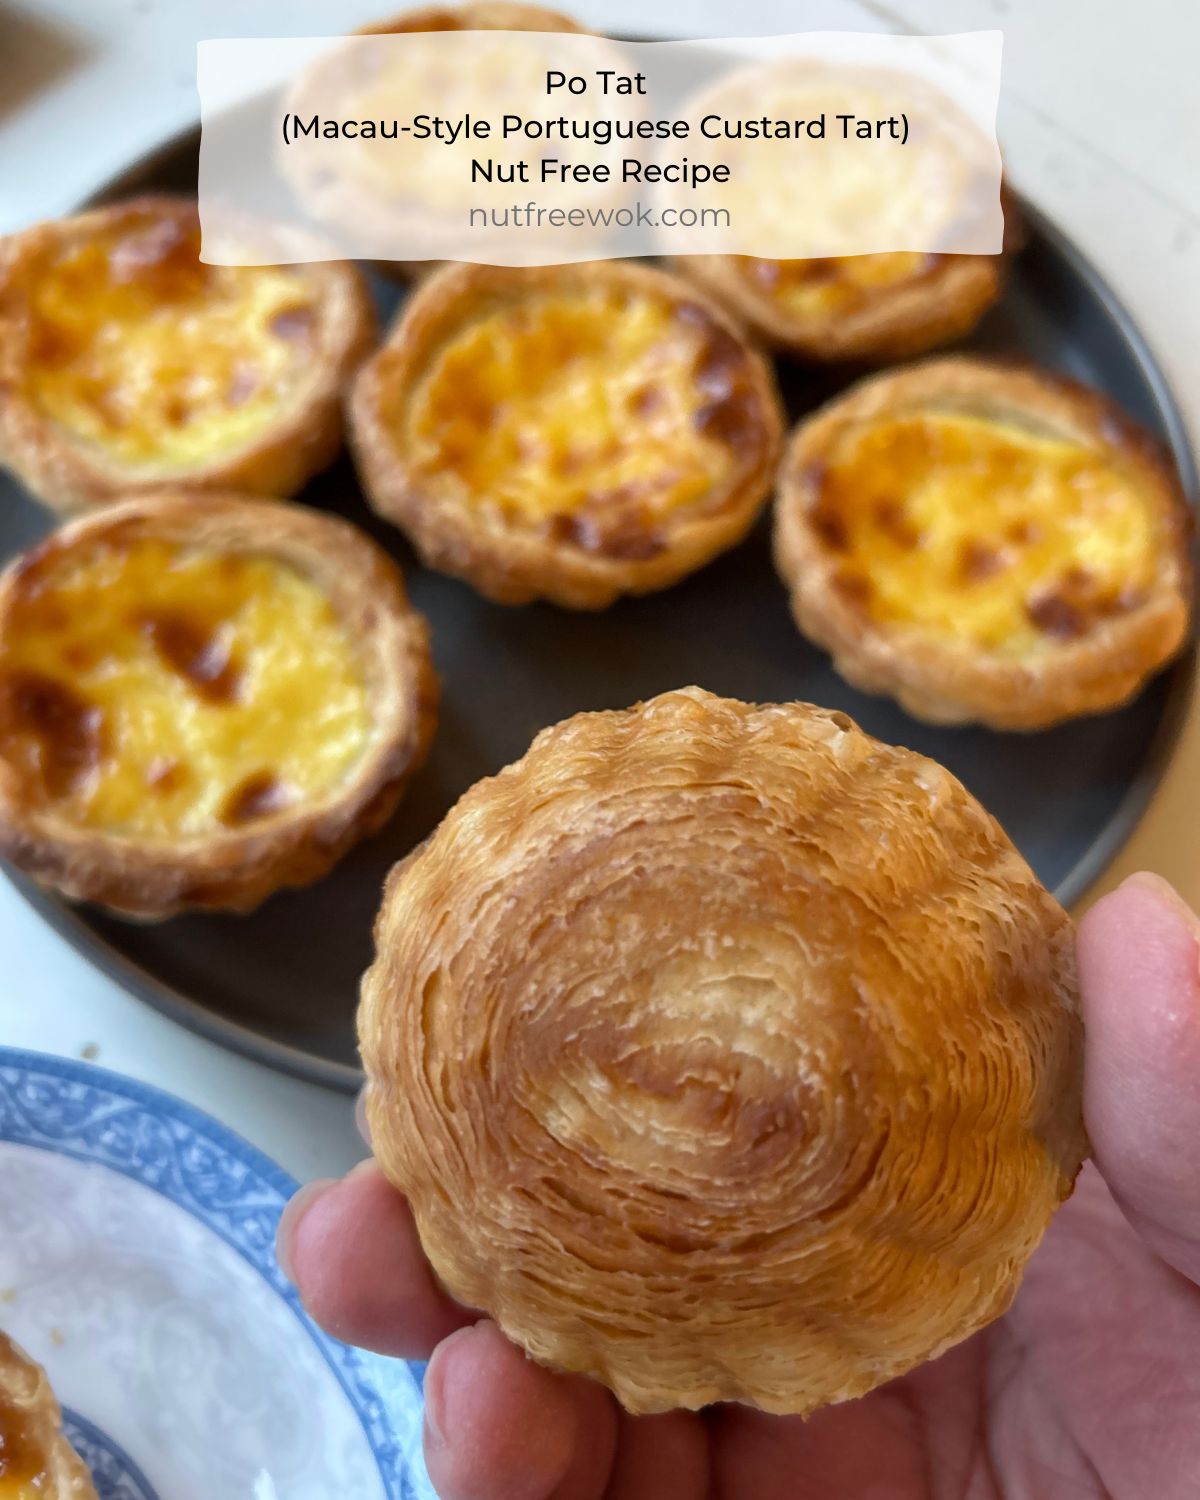
The po tat recipe that I want to share with you today will have a puff pastry crust that is rolled up into a circular swirl and baked with a creamy egg custard that is lightly sweetened.
Nut-Free and Sesame-Free Dessert
A po tat is a peanut, treenut, and sesame free dessert but some people with those allergies might not tolerate the risk of allergen cross-contact from a bakery. Most bakeries do try to limit cross-contact but it’s impossible to be absolutely sure unless the entire facility and all ingredients used are free of those allergens.
Making them at home is the best way to be assured that it’s 100% nut-free, sesame-free plus homemade po tats are extraordinary when freshly made, still warm from the oven.
I tried Woks of Life’s Portuguese Egg Tart recipe and adapted their method to make the filling less sweet. Their recipe also recommends a rough puff pastry recipe which was definitely easy but I want a flakier crust with a swirl. I adapted the puff pastry from YouTuber wantanmien’s Puff Pastry Egg Tart (which is a daan tat recipe) and rolled up the crust.
Please read the entire blog post and the recipe before starting to bake. I would say that this recipe is at an intermediate to advance level as-is. There are a lot of different po tat recipe variations so it’s possible to make po tats without egg, dairy, or wheat but I didn’t test the different variations. If you look up vegan or gluten-free po tats you might find some inspiration.
Baking Equipment
Egg Tart Molds
In order to make po tats that end up a satisfying size and shape for this recipe, you will need a standard size 3-inch egg tart molds. These simple egg tart molds that I found on Amazon are light in color, non-stick, and durable. I initially ordered 4 to try and liked them so much I ordered 8 more for a complete dozen.
I tried using cupcake/muffin baking pans because I like to use what I have. They’re adequate but I recommend flattening and then shaping with your fingers before placing them into the cupcake pan.
I also bought some fluted egg tart molds which also work but because of the resulting shape, it doesn’t hold as much custard for a po tat recipe. I think they’re better for a dan tat (egg custard) with a shortbread crust.
Rolling Pin
You will also need a classic rolling pin with the handles on the sides (not a tapered rolling pin). I recommend refrigerating it in advance and in between working with the puff pastry.
Someone gifted me a marble rolling pin which stays cold and is heavy so it’s much easier to roll the puff pastry flat. If you don’t already have a rolling pin or want to upgrade what you have, I highly recommend a marble rolling pin.
Rimmed Baking Sheet
It’s handy to use a rimmed baking sheet to transfer the po tats into the oven. The po tats will release some butter while baking and a rimmed baking sheet will help contain the mess.
Pastry Cutter
If you have a pastry cutter, use that or a couple of knives to cut the butter into small pieces.
You do not need a torch to make give the po tat a creme brulee-like carmelized appearance!
Making a Puff Pastry is Worth the Effort
I was quite intimidated about making a puff pastry from scratch and decided to try an easier option. I used frozen puff pastry sheets from Trader Joe’s which are conveniently nut free (subject to change). However, the pastry would puff upwards and push most of the custard out of the mold and make a mess.
It turns out that a puff pastry made from scratch is not difficult. You will want to be sure that you fluff up the flour with a fork before you measure and use every drop of water in your measuring cup to make a pliable dough.
You will also want to make the puff pastry when it’s not too hot outside or during the cooler parts of the day. If you decide on a hot day that you really want to make po tats, then refrigerate all your ingredients and baking equipment until they’re very cold and then work fast!
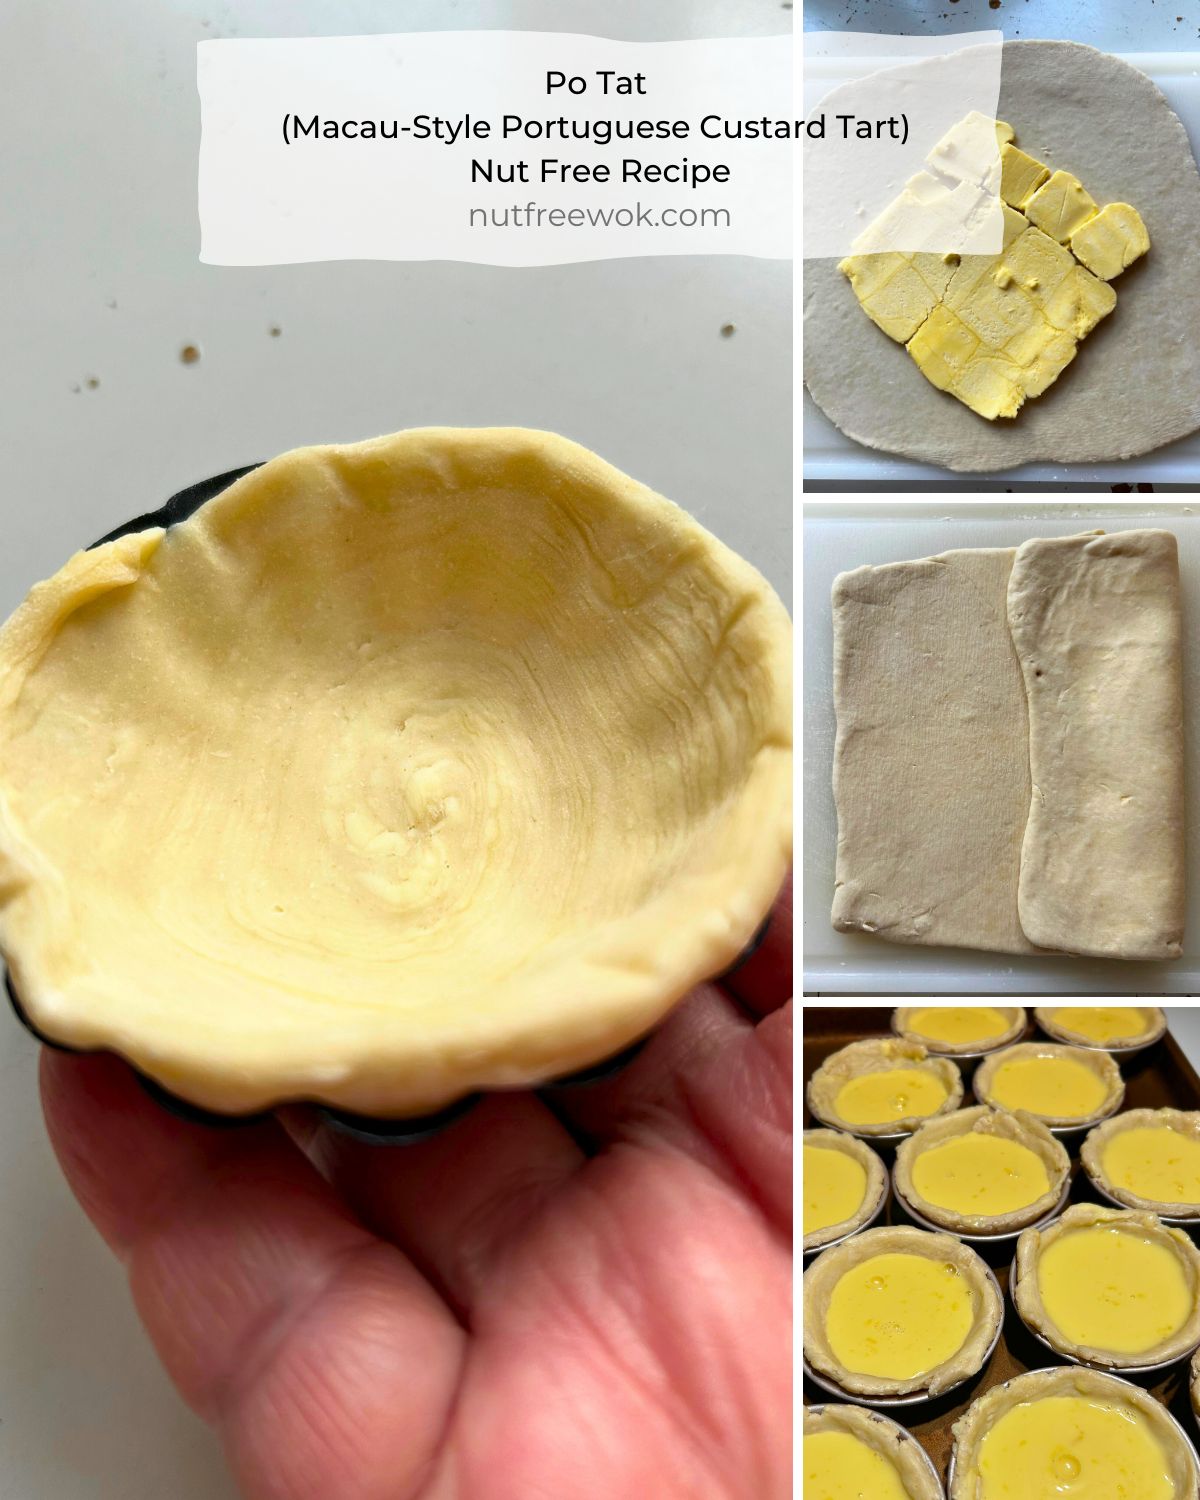
Puff Pastry Steps:
- Make a flat square sheet of butter, wrap and refrigerate.
- Then make a dough, flatten it, use it to wrap your butter sheet, and pinch the edges to seal, wrap, and refrigerate.
- Flatten the square and fold in thirds like a letter into a rectangle. Wrap and refrigerate.
- Flatten the rectangle into a long rectangle, bring the left and right sides (slightly less than 1/4 of the length) to the center, and then fold in half. It will look like a thick square, wrap and refrigerate.
- Flatten the square into a large square, then roll it up tightly into a log. Wrap and refrigerate. At this point, you can pause for the day, freeze for future use, or proceed with the recipe.
Make the Custard Filling, Timing Matters!
The po tat custard is super easy to make but you must watch it closely so that it does not boil. Put all the custard ingredients into a sauce pan on medium-low heat and stir continuously until you see little wisps of steam. Test to see if the custard is ready by dipping a clean spoon into the custard and run your finger across the back. If the filling doesn’t run back together immediately then it’s ready to remove from heat. Stir in the vanilla extract.
You will need to have a fine mesh sieve over a medium-sized bowl ready to strain the lumps out of the custard. Set the custard aside to cool to room temperature. If not making po tats right away, wrap with plastic wrap and refrigerate until ready to use.
The custard instructions are in their own section because there’s flexibility to make the custard in between steps 2, 3, 4, or 5 in the puff pastry section. Choose a distraction-free time to focus on stirring and watching for a tiny whisp of steam.
Allow enough time for the custard to cool to room temperature and then chill. Warm or hot custard filling will melt the butter in between your puff pastry layers.
Assembly and Baking Tips
Before you assemble the po tats, check that your thumbnails are short and trimmed. You will use your thumbs to shape the puff pastry into the molds and you don’t want long nails to damage the puff pastry layers. Be sure that the egg tart molds are cold and preheat your oven.
Prepare the puff pastry for shaping. I trim off the edges of the puff pastry log so that the edges are even. I save the edge scraps in case I need them for patching any holes or gaps. Cut the puff pastry log into 12 pieces and then place them into the egg tart molds, cut side up so you can see the circular pattern.
To shape the puff pastry into the mold, use your thumb to push down the center and use the tip of your thumb to press the puff pastry into the base in a circular motion, working outwards.
Then as you work your way toward the sides, use your thumbs to press the puff pastry into the sides as you pull the dough up toward the top and form a slight ridge above the rim of the mold.
Check that there are no gaps or holes and, if necessary, pinch a little piece of the puff pastry scraps and press them in. Repeat with the other molds and puff pastry. Place the finished molds into the refrigerator as you finish.
When all the puff pastries are shaped in the molds, place them on your rimmed baking sheet and work near your oven. Fill each mold with about 2 tablespoons of custard, without dripping on the sides of the puff pastry. I use a soup ladle to fill the molds about 85-90% full. Do not fill the molds to the top because the custard will puff up and overflow if the molds are filled to the top.
It takes about 25 minutes to bake the po tats. I always set my timer for 20 minutes to check on them and to be ready to take them out. If the custards have a few brown spots and are slightly bubbly, they will be ready in 5 minutes.
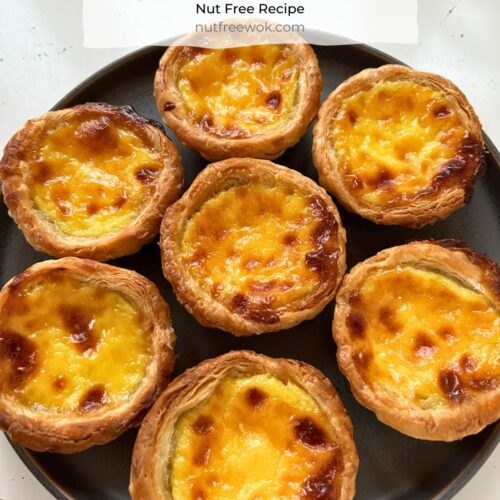
The po tats are ready when the puff pastry is golden brown around the edges and all the custards are bubbly. Take the baking tray out of the oven and allow the po tats to cool in their molds for 5-10 minutes. Transfer them to a cooling rack using a small spatula and a fork (or chopsticks) for balance.
How to Serve, Store Leftovers, and Reheat
We find warm po tats irrestible to eat after they’re removed from the molds. But be careful as the filling will be very hot and may need a few more minutes to cool down. Serve with your favorite beverage such as coffee, tea, or milk and some cut fruit for a refreshing snack.
When we buy po tats at a Chinese bakery, the po tats might be fresh out of the oven but they’re cooled down to a safe temperature by the time they get home. In a dim sum restaurant, they cool down a bit while servers pushed them around in a cart.
Allow the po tats to cool to room temperature before storing them in an airtight container and refrigerating them. You can reheat them in an oven for a few minutes. If you are serving just a few, then use a toaster oven or air fryer at 350°F for 2-3 minutes. It’s best to eat them within 1-2 days or the crispy crust will become soft. We seldom have any leftovers after 24 hours.
Allergy Aware Po Tats
This recipe is free of peanuts, tree nuts, sesame, shellfish, fish, and soy as written. If allergic to dairy, you might be able to substitue the butter with a buttery margarine and swap the milk and cream with a dairy-free milk substitute. I saw some vegan versions of po tats that use tofu as an egg substitute. And you can probably find a gluten free puff pastry recipe or buy them in stores. Results may vary since too many adaptations are unpredictable.
Most of the ingredients are simple ingredients that are typically free of cross-contact with allergens. Whenever I can, I use the best ingredients I can so that the results are worth the effort. I use Rodelle vanilla extract because their vanilla extracts are nut-free and excellent quality at a great price.
People with food allergies have to say no to so many things and must put in extra effort to make safe foods to eat. When practical, I like to add small touches to make our food taste better and/or look special. One super easy way is to use vanilla beans instead of vanilla extract.
If I’m feeling fancy, I would use vanilla bean paste because those vanilla bean specks make my heart happy. If I’m feeling extra fancy, I would do what I do to make a vanilla ice cream. Use a whole vanilla bean, split and scrape the vanilla seeds out, and simmer the pod with the custard. And then after straining the custard, I would pop that pod back into the custard and let it keep infusing. Yummm!
Po Tat (Macau-Style Portuguese Custard Tart) Nut Free Recipe
Ingredients
Puff pastry crust
- 10 tablespoons unsalted butter divided
- 1 ½ cup all-purpose flour (225 grams) plus ¼ cup, as needed
- 1 teaspoon granulated sugar
- 1/8 teaspoon salt
- 6.75 tablespoons ice water (100 ml)
Custard filling
- 5 yolks (reserve egg whites for other purposes)
- ¾ cup milk I use 1% or non-fat
- ½ cup heavy whipping cream
- 1/4 cup granulated sugar
- 1 tablespoon cornstarch
- 1 teaspoon vanilla extract
Instructions
Puff Pastry
- Cut 1 stick of butter (8 tablespoons) into 12 slices and arrange them in a 4×3 grid on one side of a large piece of parchment paper. Fold the parchment paper over the butter and fold the open edges so that the parchment paper is approximately 6×6 inch square. Use a rolling pin the roll the butter into one flat 6×6 inch piece. Refrigerate the parchment paper wrapped butter, rolling pin, and pastry molds until needed.
- In a medium size mixing bowl, use a pastry cutter (or two knives) to cut the remaining 2 tablespoons of butter in 1 ½ cup flour, 1 teaspoon sugar, and salt until the butter looks like grains of sand. Add the ice water and mix with a wooden spoon until a dough forms. If the dough seems too shaggy, add 1 tablespoon of flour. If a dough doesn't form, add 1-2 teaspoons of ice water, one teaspoon at a time. Lightly flour a large cutting board and knead the dough a few times until the dough is smooth. Shape the dough into a square, wrap the dough with plastic wrap, and refrigerate for 20 minutes to let the dough rest.
- Lightly flour the rolling pin and cutting board, use a rolling pin to roll the dough out into an approximately 9×9 inch square. Unwrap the butter square and place it diagonally on top of the dough and fold the corners down to wrap the butter, gently stretching the edges if needed. Pinch the edges close with your fingers and use a lightly floured rolling pin to the roll the dough edges together. Wrap with parchment paper and refrigerate the dough and the rolling pin for 20-30 minutes.
- Lightly flour the rolling pin and cutting board, unwrap the dough and roll it into a rectangle and fold the left third toward the center and the right third toward the center (like a letter). Wrap the dough with parchment paper and refrigerate along with the rolling pin for 20-30 minutes.
- Lightly flour the rolling pin and cutting board, unwrap the dough and roll it into a long rectangle (18×4 inches) and fold the two ends to the center and fold in half into a square. Wrap with parchment paper and refrigerate for 20-30 minutes.
- Lightly flour the rolling pin and cutting, unwrap the dough. Use your rolling pin to press down several times on the pastry square to flatten the dough, then roll it out into a large square (approximately 12×12 inch). Brush off any excess flour, and use your fingers to roll the square into a tight log, wrap with parchment paper, and refrigerate for 20-30 minutes or until ready to assemble.
Custard Filling
- You will need 15 minutes of uninterrupted work time to make the custard filling, ideally during one of the breaks while waiting for the puff pastry to rest. In a small 1-quart saucepan, beat the egg yolks with a whisk. Add milk, heavy whipping cream, sugar, and cornstarch, stir to combine. Cook the egg mixture on low-medium heat, stir constantly until you see a whisp of steam, and the egg mixture thickens slightly (approximately 8-10 minutes). Test by dipping a clean spoon into the custard and then run your finger across the back of the spoon and if there’s a clear line, remove from heat immediately.
- Add the vanilla and stir to combine. Pour the filling through a fine mesh strainer into 2 cup spouted measuring cup or a bowl, discard any solids. Allow the custard to cool to room temperature, cover, and then refrigerate until ready to fill the pastry cups.
Assembly and baking
- When ready to assemble the custard filling with the puff pastry, check that the oven rack is in the middle and preheat the oven to 425°F. Take the egg tart molds out of the refrigerator.
- Unwrap the log, trim off the rough edges, and set aside the scraps. Cut the log in half, cut each half into quarters, and cut each quarter into 3 pieces. Keep the cut pieces of dough covered with parchment paper as you shape the dough into the pastry molds.
- Place a piece of dough into an egg tart mold cut side down and use your thumb to press the center of the dough spiral onto the base of the mold. Use your thumbs to press the dough onto the side of the mold while gently pulling the dough up toward the top edge so that there’s a little rim of dough above the edge of the mold. Repeat until all the molds are shaped and if it’s a hot day, refrigerate them for 10-20 minutes.
- Work at a kitchen counter closest to your oven, place the pastry molds onto a rimmed baking sheet and neatly fill the pastry shells with approximately 2 tablespoons of filling (85% full). I use a soup ladle with a pouring spout.
- Place the tray of filled pastry shells into the oven and bake for 25 minutes. Set a timer for 20 minutes to check on their progress. They are ready when pot tat shells are golden brown, the filling is bubbly, and the tops have a slightly caramelized appearance. Allow to cool for at least 10-15 minutes and serve warm or at room temperature.
Notes
Nutrition
Related Recipes
If you prefer a savory egg custard, you can make my Easy Chinese Steamed Egg Custard Recipe.
However, if you want a delicious Chinese dim sum dessert but top allergen free, I actually have two recipes that are very popular. Try making Easy Top 9 Allergen Free Banana Rolls Recipe. The second recipe for Baak Tong Gou, a Top 9 Allergen Free Chinese Dessert has a marvelous honeycomb appearance.
Thanks for reading, please help Nut Free Wok!
If you like this post or recipe, please be sure to give a 5 star rating, leave a comment, and share this post! Your support means a lot to me.
Subscribe to Nut Free Wok’s email subscription (be sure to respond to the confirmation email). You will be notified by email next time I publish another post or recipe and I won’t send you spam or share your email address with anyone.
Disclosure/Disclaimer:
I may mention the names of stores and/or brand names of products that I use because readers ask and I share products and sources which I use and think may be helpful to readers, all opinions are my own. Please note that manufacturing practices and ingredients can change at anytime without notice and readers are always responsible for assuring allergen safety before buying or consuming foods. NutFreeWok.com is a participant in the Amazon Services LLC Associates Program, an affiliate advertising program designed to provide a means for sites to earn advertising fees by advertising and linking to Amazon.com. Thank you for reading!


Macau style?
That’s pastel d nata🤦🏻♂️
The one thing I’m missing from my personal experience is eating an authentic patel de nata either in Portugal or from a Portuguese bakery but I suspect that the Chinese version, Po Tat, is a little bit less sweet to suit the Asian palette and the pastry crust may vary a little bit. This dessert reflects one little aspect of the history of colonization. Imagine what Macua would have been like without colonization, food for thought?
Made Portuguese egg tart for the first time and they turn up fantastic. I use 40g of sugar only for the custard filling. Just right. Thank you for your recipe. Will use this one to make in future.
I’m so happy the recipe turned out for you! Thank you for sharing.
The Portuguese Egg tart was actually invented by Andrew Stow, a Brit that combined the pastel de nata pastry with an English custard at his bakery in Macau. Locals called it the Portuguese egg tart and the name stuck
Thank you so much for letting me know!! I appreciate your time and looked up Andrew Stow and you are absolutely right.