
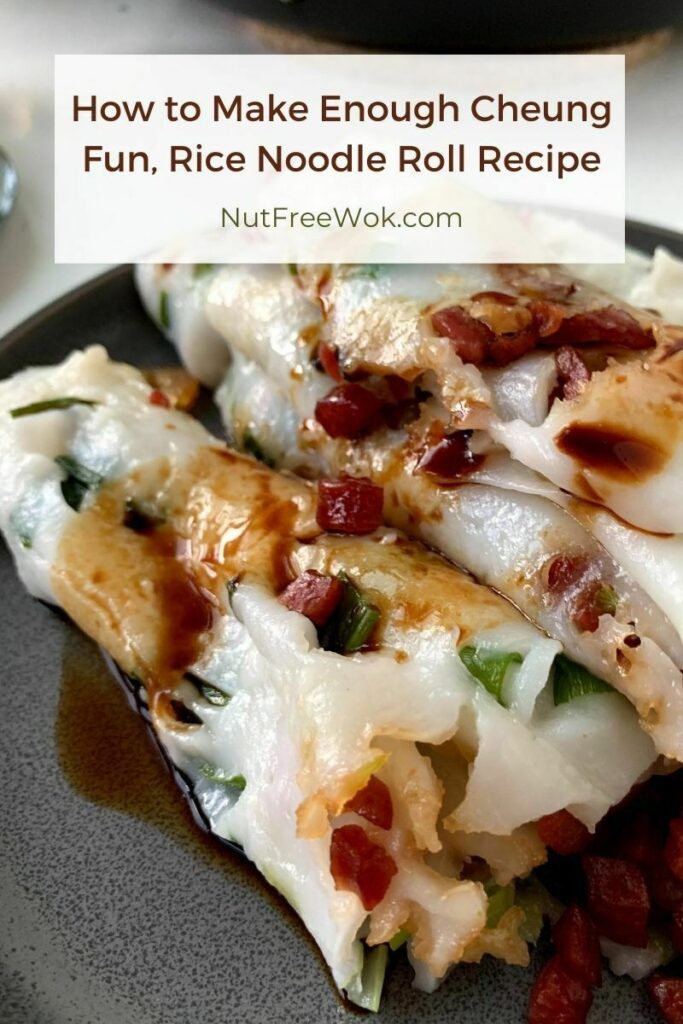
This Chinese dim sum favorite, rice noodle rolls or cheung fun with shrimp and Chinese sausage recipe, made in a super sized electric skillet will please a family or a crowd. There’s no such thing as “too much” cheung fun, it’s always “not enough” but this recipe might satisfy even me.
Disclaimer: Please check that all ingredients are suitable for your allergies and be sure to ask your medical care team regarding any allergy related questions (I do not share medical advice). As an Amazon Associate, I earn from qualifying purchases.
Jump to RecipeWhat is Cheung Fun?
My most favorite food in the world is cheung fun, a Cantonese-style rice noodle roll served in dim sum restaurants. I love it so much that I shared a beef rice noodle roll recipe as my very first blog post. It was my way of introducing myself, “Hello, my name is Sharon and I love cheung fun.”
Fast forward to 2020, buying groceries, eating out, and picking up takeout are not the same, if not challenging due to the global supply chain issues. Our favorite restaurants won’t make cheung fun to go and even premade cheung fun sold in Asian grocery stores has nearly doubled in price.
My very first recipe, beef rice noodles, is still very good. I made it again recently and the flavor and texture are spot on. It’s so good that we always want more since we are big cheung fun eaters. When we yum cha (literally drink tea, but it means eating out for dim sum), we often order 2-3 plates of cheung fun. It’s very time consuming to make that much at home. It’s time to revisit how to make cheung fun at home more efficiently.
Need a Bigger Steamer Set Up to Make Lots of Cheung Fun
Typically I set up a steamer in a regular sized pot, but I want to be able to make a large rectangular sheet of rice noodle. I have a 9×13 inch glass casserole dish but I would need a large rectangular pot that takes up two burners on my stove. Since I can’t find a pot like that so I decided to consider a large rectangular electric skillet.
I contacted two electric skillet manufacturers about the inside dimensions of their electric skillets so I can better estimate whether or not my 9×13 casserole dish would fit. Presto emailed me back with the dimensions, 15.75 x 12.25 x 8.37. I measured my 9×13 casserole dish and even including the handles, it still fits with about 1/2 inch clearance on each side.
I am so excited to use the Presto electric skillet for other dishes such as steaming large whole fish, making a lot of pancakes at the same time, hot pot, etc.. One of my favorite features is a glass lid so I can see whether the cheung fun is ready without having to interrupt the cooking process by lifting the lid to check.
At one point, I noticed that the electric skillet I purchased was out of stock but they have two different 16-inch options available now. If I didn’t have an electric skillet already, I would like their new slimline version of a 16 inch skillet because it is less bulky.
However, the Presto electric skillet is my most bulky small appliance and takes up considerable storage space in my small kitchen. In my humble opinion, making lots of cheung fun at home is worth the effort to make space for the electric skillet.
You can still make this recipe without an electric steamer by using a large pot with a lid that can hold a 9×9 or 8×8 square baking pan instead, but it will take you longer to steam all the batter. Be sure to read my cooking tips for steaming food.
Need Two 9×13 Metal Pans To Save Time
I made test batches using one Pyrex 9×13 glass casserole dish, which has a smooth even surface so the noodle cooks evenly and is easy to roll up. It’s too hot and steamy to remove the glass casserole dish out of the electric skillet. Instead I roll the noodles and set up a new batch with the casserole in the skillet, which takes about 3 minutes. How can I save 3 minutes for every roll I make?
I referred back to my Beef Rice Noodle Roll recipe, and in that recipe I use square metal baking pans that can float in the water while steaming. That makes it so much easier to make rice noodles with an even consistency and to take the hot steamy pans out. I bought 2 9×13 metal pans with a smooth surface and no handle or edges to get in the way.
While the water comes to a boil in the electric skillet, I set up both pans by brushing some oil to the bottom and edges, add the green onions, sausage, shrimp and batter. Steam the first tray for 5 minutes, take it out, add the second tray and while the second tray is steaming, I brush a fish turner with oil and roll the cooked noodles and repeat the process of oiling the first pan and filling it with rice noodle ingredients.
You can use whatever equipment you have but for maximum efficiency, I recommend using two metal 9×13 pans with a smooth flat surface and no or very small handles or rims (total width must be smaller than 15.75 inches wide to fit inside this particular electric skillet. The metal pans do start cooking the batter immediately so I recommend setting up your fillings and batter in the pan before placing it in the electric skillet.
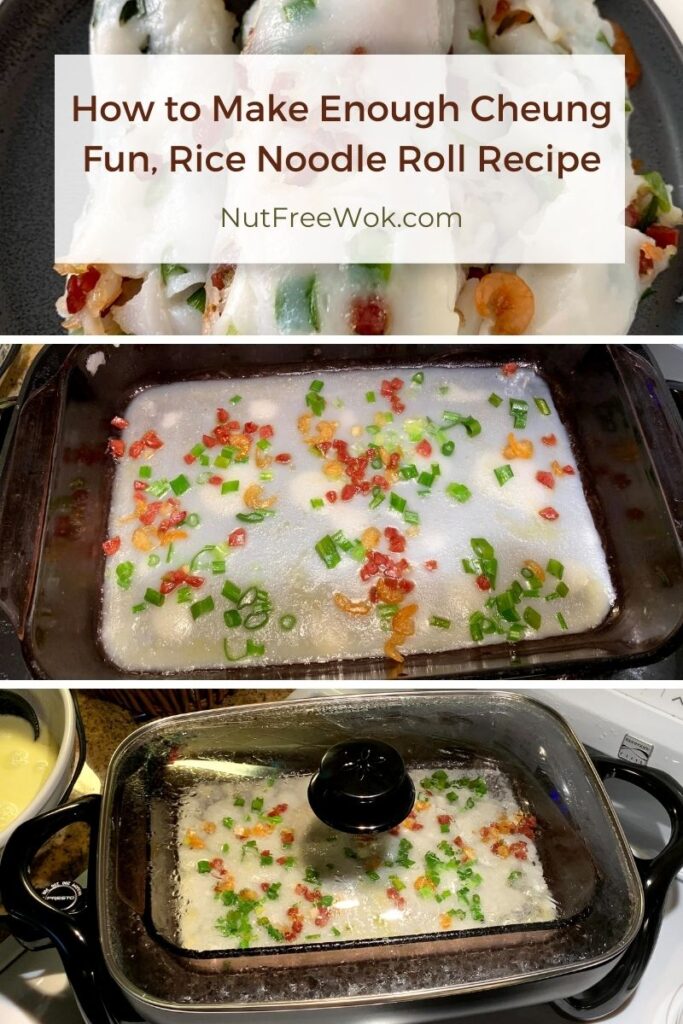
Photo credits: my son <3
Cheung Fun Rice Noodle Rolls Variations
The most basic cheung fun rice noodle roll you can make is a plain rice one with a drizzle of sweet soy sauce. You can also make cheung fun with only herbs and vegetables such as green onions, cilantro, and/or shredded carrots.
My personal favorite is a cheung fun with chopped green onions, dried shrimp, and with a little bit of small dice Chinese sausage. The nice thing is that once you have the set up and basic rice noodle batter recipe, you can customize the fillings exactly the way you like it to suit your food allergies, dietary preferences, and access to ingredients.
- Beef Rice Noodle Rolls are steamed with a marinated ground beef.
- Make Tasty Char Siu Rice Rolls With a Pizza Pan – this one is a fun recipe using a perforated pizza rack and parchment paper.
- Learn how to make Fabulous Shrimp Rice Roll (Ha Cheung), a recipe from a cookbook written by the owner at Nom Wah, a New York City Chinatown dim sum restaurant.
Allergy Aware Cheung Fun Ingredients
Flour and Starch Ingredients
Rice Flour – The main ingredient is rice flour, it usually sells for less than $2 per pound if you can find it locally and maybe a little more if you have ship it. It’s important to mention that rice flour is different from glutinous rice flour a.k.a. mochiko rice flour, which is made from sweet rice or sticky rice (and does not contain gluten either). You must use rice flour for this recipe.
I have been able to verify that the Flying Horse brand (distributed by Walong Marketing) is made in a nut free factory, they do use wheat flour in a separate room and separate production line.
The Flying Horse packaging looks very similar to Erawan’s rice flour. I don’t know if Erawan is the name brand version of Flying Horse, but it is an Asian brand that I can find at every Asian market. Erawan’s contact information is on the front of the package if you want to call or write to them for more information.
Tapioca Starch – I used the Flying Horse brand of tapioca starch which helps the rice noodle be more pliable. I didn’t test the recipe with tapioca starch or tapioca flour made by other brands such as Let’s Do Organic’s Tapioca Starch that are easier to verify for food allergies. I think other brands should still work as I have tested this recipe using different combinations of tapioca starch, corn starch, and wheat starch. The resulting cheung fun all taste fine but with slightly different textures.
Note that tapioca starch is also referred to tapioca flour interchangeably. But tapioca starch and tapioca flour are not the same as cassava flour because tapioca starch (tapioca flour) is a byproduct of making cassava flour.
Wheat Starch – I use the Red Lantern brand (affiliate link) of wheat starch which I cannot verify about food allergies. I’ve used it before we had food allergies and the only wheat starch option so I can’t suggest any alternatives to wheat starch.
I did test making cheung fun without wheat starch for people who are gluten free or have a wheat allergy or who can’t find a wheat starch that works for their allergies. When I omitted the wheat starch and doubled the tapioca starch, the cheung fun still look the same but there’s a slight difference in texture which is not significant.
Filling Ingredients
Dried Shrimp – Other than reading the label, I cannot verify the allergen information for dried shrimp. Usually it’s sold in bulk at Chinese herbal or dried goods shops or in packages found in the refrigerated sections of Asian supermarkets. The ingredient label is usually simple, shrimp, salt, and sometimes sulfite. I look for dried shrimp that is slightly pale in color to avoid sulfites rather than the bright orange dried shrimp preserved with sulfites. You can use bay shrimp as an alternative or skip the shrimp altogether and use shredded carrots instead.
Chinese Sausage – I also rely on reading the ingredient label for Chinese sausages (lop cheung). I buy Kam Yen Jen Chinese sausages, which are available at Costco occasionally. I also like Chinese Brand Sausage Extra Lean (distributed by www.chanchancorp.com) because it’s free of added nitrates and uses celery powder. In a pinch, you could chop up a some Asian flavored pork jerky.
This recipe is free of peanuts, tree nuts, milk, egg, fish, and sesame as written.
If you are avoiding wheat, you can easily modify this recipe by omitting the wheat starch and doubling the tapioca starch and use your usual wheat-free rice flour instead. You can also season with tamari sauce instead of soy sauce and substitute the Chinese sausages (most likely will contain soy sauce) with bacon.
People with soy allergies can use a soy free soy sauce instead of soy sauce and swap out the Chinese sausage with other meats like bacon or thinly sliced pork belly. If you have a shellfish allergy, omit the dried shrimp and use a little more Chinese sausage and/or use shredded carrots to add more veggies.
Cheung Fun with Shrimp and Chinese Sausage Recipe
Equipment
- large mixing bowl
- two 9×13 baking pans*
- large electric skillet*
- frying pan
- heat safe or silicon pastry brush
- whisk
- fish turner, or thin sturdy spatula
Ingredients
Rice Batter:
- 3 cups rice flour
- ½ cup tapioca starch
- ½ cup wheat starch
- ¼ cup olive oil or other neutral cooking oil
- 1 teaspoon salt
- 3 cups room temperature water
- 2 cups boiling hot water
Toppings:
- 1 teaspoon olive oil
- 2 Chinese sausages lop cheung, fine dice
- ¼ cup dried shrimp rinse, soak, clean with a toothpick as needed, and drain
- 1 shallot, chopped or 1/4 cup chopped onions
- 2 teaspoons soy sauce
- 1 teaspoon sugar
- 1 bunch green onions, chopped 2 cups
- 2 tablespoons olive oil (or more, for oiling the pan and fish turner)
Sweet Soy Sauce:
- 2 tablespoons soy sauce
- 2 tablespoons water
- 1 teaspoon sugar
Instructions
- Combine the rice flour, tapioca starch, wheat starch, salt, 1/4 cup olive oil and 3 cups room temperature water with a whisk until the batter is smooth. Stir in the boiling water. Set aside and allow the batter to rest at least 30 minutes (up to overnight).
- Heat up a frying pan on low heat and add the finely diced Chinese sausages to the cold frying pan, stir occasionally for 5 minutes. Raise the heat to medium and add 1 teaspoon of olive oil. Add the rinsed, soaked, and drained dried shrimp and stir fry until fragrant and Chinese sausages look slightly crispy. Lower the heat and add 2 teaspoons of soy sauce and 1 teaspoon of sugar and stir fry until the sugar is dissolved and the ingredients are coated with sauce. Remove from heat and set aside.
- Stir together 2 tablespoons soy sauce, 2 tablespoons water, and 1 teaspoon sugar and set sweet soy sauce aside until ready to serve.
Set up and Assembly
- Fill the electric skillet about halfway with water, add the lid, and turn the dial to 300 and wait for the water to boil. Warning: follow all manufacturer’s safety directions and be careful that the electrical cord is secure and out of reach of others.
- You will need to organize your space and plan out where will you put the lid in between batches, where will you roll the rice noodles and oil the pan and refill the pan with toppings and batter.
- Brush two 9×13 inch metal baking pans with olive oil, add 2 tablespoons of the meat topping, ¼ cup of chopped green onions, and about ¾ cup of rice flour batter (you want a thin layer of batter at the bottom of your pan) to each of the pans.
- When the water is boiling, add one of the prepared 9×13 pans to the electric skillet and center the pan so that you can add cover the skillet with the lid. Check that the lid fits securely on all sides and steam for 5 minutes.
- The rice noodle is ready when you see that there are big blister like bubbles under the rice noodle. Carefully remove the lid and set aside, use oven mitts or thick dish towels to take the pan out and set aside. Add the prepared second pan to the electric skillet and steam for 5 minutes.*
- In the meantime, use a lightly oiled silicon spatula or fish turner (something thin and slightly angled is ideal) in one hand and chopsticks or a spatula in your other hand and roll the rice noodle along the long side of the pan. Fold the roll in half and scoop it out of the pan and into a serving platter. Repeat and oil the pan, add the toppings, and batter until you use up all of your ingredients. Be sure to check that there's enough water in the skillet to steam the cheung fun, refill with water as needed.
- You can serve one roll per person or cut each roll into 6-8 pieces, drizzle with 1-2 spoonfuls of the sweetened soy sauce and serve with the soy sauce on the side as needed.
Notes
Nutrition
I’m so excited by making cheung fun again that I actually have some other techniques and variations planned. Please let me know if you try this recipe, if you have questions or comments, and I will try to incorporate them in my next cheung fun recipe (edit to add: I shared Nom Wah Cookbook’s Shrimp Rice Roll recipe, it’s delish!).
Thanks for reading, please help Nut Free Wok!
If you like this post or recipe, please be sure to give a 5 star rating, leave a comment, and share this post! Your support means a lot to me.
Subscribe to Nut Free Wok’s email subscription (be sure to respond to the confirmation email). You will be notified by email next time I publish another post or recipe and I won’t send you spam or share your email address with anyone.
Disclosure/Disclaimer:
I may mention the names of stores and/or brand names of products that I use because readers ask and I share products and sources which I use and think may be helpful to readers, all opinions are my own. Please note that manufacturing practices and ingredients can change at anytime without notice and readers are always responsible for assuring allergen safety before buying or consuming foods. NutFreeWok.com is a participant in the Amazon Services LLC Associates Program, an affiliate advertising program designed to provide a means for sites to earn advertising fees by advertising and linking to Amazon.com. Thank you for reading!

Squeal! Thank you for the reminder. I’ve been wanting to make this for a loooooong fine now. I’ll have to grab some pictures. ❤️
All right!! I love that you love rice noodles as much as I do! Let me know how it goes!